Map: Difference between revisions
No edit summary |
No edit summary |
||
| Line 3: | Line 3: | ||
[[Image:screenshot_map.png|256px]] | [[Image:screenshot_map.png|256px]] | ||
The [[File:Portalred.png|32px]] loops through your position and your portal positions. If you long press it, you will enable "follow mode" where the map is always centered at your current position. Clicking again toggles this setting to "off". | |||
There are two main modes on the map: placement mode and scoring mode. Toggle mode using [[File:toggle_map.png|32px]]-button | There are two main modes on the map: placement mode and scoring mode. Toggle mode using [[File:toggle_map.png|32px]]-button | ||
| Line 11: | Line 11: | ||
In scoring mode you can see the scoring areas (small, medium or big, depending on your zoom level), a haircross for area selecting and the ranking (TODO IMAGE). | In scoring mode you can see the scoring areas (small, medium or big, depending on your zoom level), a haircross for area selecting and the ranking (TODO IMAGE). | ||
Below the map (white background with small icons): Summary of idle [[Worker]]s and available [[Transmitter]]s and also available [[Portal]]s. | Below the map (white background with small icons): Summary of idle [[Worker]]s and available [[Transmitter]]s and also available [[Portal]]s. In order to place a transmitter you click the transmitter here to open the transmitter to place-selection. | ||
= Fountains = | = Fountains = | ||
Revision as of 07:58, 28 March 2017
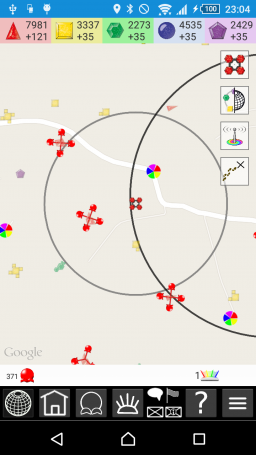
The main view. (you can back up to this view from the others)
The ![]() loops through your position and your portal positions. If you long press it, you will enable "follow mode" where the map is always centered at your current position. Clicking again toggles this setting to "off".
loops through your position and your portal positions. If you long press it, you will enable "follow mode" where the map is always centered at your current position. Clicking again toggles this setting to "off".
There are two main modes on the map: placement mode and scoring mode. Toggle mode using ![]() -button
-button
In placement mode you can see your location and "free placement"-radius, fountains, placed workers (yours and others), your portals and treasures.
In scoring mode you can see the scoring areas (small, medium or big, depending on your zoom level), a haircross for area selecting and the ranking (TODO IMAGE).
Below the map (white background with small icons): Summary of idle Workers and available Transmitters and also available Portals. In order to place a transmitter you click the transmitter here to open the transmitter to place-selection.
Fountains
See Fountain.
This is where you gather Crystal.
Workers
File:Workerblue.png File:Workeryellow.png File:Workergreen.png File:Workerred.png File:Workerpurple.png
On the fountains you see placed workers, yours and others. Only workers of the correct color may be placed on them.
See Worker on how to produce, place and modify workers.
Portals
Allows you to remotely place workers.
See Portal
Treasures
See Treasure for information about them

